This is the story of how we deployed a 6DOF arm robot on rapyuta.io cloud platform – with full access to a “robot command station” in JupyterLab! We’re using the Niryo One robot here, but you could do this with any similar robot.
Introducing the Cloud!
rapyuta.io is a platform to run ROS in a distributed fashion: some components can run on the robot, and some can run in the “cloud”. The cloud can consist of multiple machines, where each specializes in a certain task – giving a robotics developer “infinite firepower” to do heavy computations. rapyuta.io runs on Kubernetes (although as a user one doesn’t need to interact with that), and cloud packages are deployed through a docker image. Furthermore, rapyuta.io is ROS1 native, and can transparently manage multiple masters. The different masters communicate over the “cloud bridge”, and one can expose ROS topics, services, and actions easily.
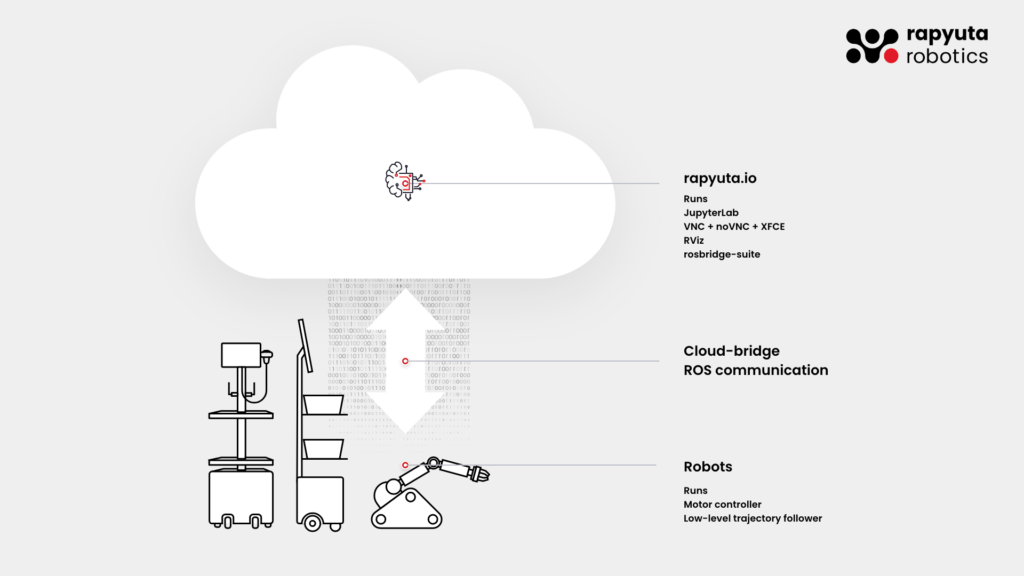
Cloud deployment is usually done through docker images. These docker images can be automatically built on rapyuta.io. For this blog post, we’ve developed a fully integrated docker image that comes with “batteries included”: it spins up a VNC server to interact with the robot through RViz, as well as a JupyterLab instance with useful plugins installed: Comment
- Use the VNC connection with the jupyterlab-novnc plugin
- Natively interact with rostopics through JupyterLab terminal
- Use Zethus, rapyuta’s web-native RViz replacement
- or check out the Webviz integration (the ROS visualization framework from Cruise)
Creating a Robot Simulation
With all robotics development, it’s important to be able to simulate the robot – it can be expensive or difficult to run the actual robot, and certain aspects of the robot’s behavior can be well analyzed in simulation. For this, we’ll create a simulated environment first – using the same docker image to later control the robot. ROS usually makes this easy! Comment
For this purpose, we created two Dockerfiles: a base docker image that contains JupyterLab and the extensions mentioned beforehand, and a more specific Dockerfile to launch a Niryo One. The more specific Dockerfile installs the correct ROS packages for planning motions with Moveit for Niryo One. In a similar spirit, one could build additional docker images for different robots.
In that Dockerfile, we have a starting script that can launch the Niryo One either in sim mode or in real mode.
These docker images can be built on the rapyuta.io platform directly – for that it’s enough to click on “Builds” -> add new build, and then point to the GitHub repository and the Dockerfile contained within. This will build the docker image and create a tag, which can be uploaded to Dockerhub if one adds a Dockerhub secret token to the account (under the “Account -> Secrets”). By the way, the same docker image can be used locally for debugging purposes as well!
For this docker image, we need to create a “package” with some additional configuration for web endpoints, ROS topics, etc. For this, we can create another package with the docker image build, and this time the runtime is “Cloud” since this should run in the rapyuta cloud. As executable we choose the Niryo specific cloud docker image and give a 2 core CPU limit to have a slightly beefier machine (a smaller machine would probably also be OK though).
We also need some endpoints for the different services exposed to the web:
VNC_EXTERNAL: map 443 to 6901 (this is the VNC stream)jupyterlab: map 443 to 8888 (to connect to the jupyterlab instance)ROSBRIDGE_WEBSOCKET_ENDPOINT: map 443 to 5555 (this is the rosbridge server)
The trick with rapyuta.io endpoints is that you can have multiple 80 (http) or 443 (https) endpoints – because each of them will have a different URL that is generated when deploying the package. These URLs are available as environment variables when the docker image starts. We use these variables to configure the Jupyterlab settings to point to the right URLs and have an “automagic” config for the rosbridge and VNC endpoints.
ROSBRIDGE_WEBSOCKET_ENDPOINT_HOST="${ROSBRIDGE_WEBSOCKET_ENDPOINT_HOST:-localhost}"
ROSBRIDGE_WEBSOCKET_ENDPOINT_PORT="${ROSBRIDGE_WEBSOCKET_ENDPOINT_PORT:-5555}"
...
rapyuta.io will inject these environment variables when the deployment starts! Comment
At the end of this article, you’ll find some instructions on how to package all that up into a single Ansible deployment script that will create all necessary resources on rapyuta.io with a single script (much more convenient for developers, actually).
We can then deploy the Docker image / Package into the cloud where it will boot up on some virtual machine.
If you want to take the fast lane, the package can be imported with the below button:
Connecting the Real Niryo One
The Niryo One robot is small comes with a Raspberry Pi 3B+ and runs on ROS – so it’s the perfect little device to make a demo. Unfortunately, it’s officially limited to run with ROS kinetic, but we’ve taken the time to update it to ROS melodic and run on Ubuntu Server with ARM64 support (instead of ARM32). You can find the code changes in this pull request: GitHub. We also include a quick walkthrough of necessary steps to install melodic properly on the Niryo One robot. Comment
Once this is installed, you can register the Niryo One as a “Rapyuta Device”. For this, it’s enough to navigate to the rapyuta.io interface, click on “Add Device” and follow the instructions. This will register the device securely with the rapyuta.io platform (using the long token provided as part of the download script), and after initialization, it will install a bunch of packages to connect the different ROS masters via cloud bridge. On low-power hardware like the Raspberry Pi, this takes 3-5 minutes, and then we’re ready to talk via ROS with the cloud.
Connecting the Robot to rapyuta.io
We now want to deploy software through rapyuta.io. For this, we need to create a package: a package is a definition of what is going to be run on the robot or in the cloud, and what ROS topics are going to be forwarded into the cloud (or to the robot). Comment
On the Niryo One robot, we have a start script in /usr/sbin/niryo-one_start that we instruct rapyuta.io to execute when it’s launching on the robot. The component runtime is “Device” and the “Executable Type” is “Default” (that means that the binary executable file is already installed). We could also use docker to spawn up a Docker image on the device – but since we have such a low-powered Raspberry Pi here, and we need direct access to the hardware (such as /dev/mem, /dev/gpio…) to control the motors, LEDs, and sensors, we spin up a pre-installed binary on the host.
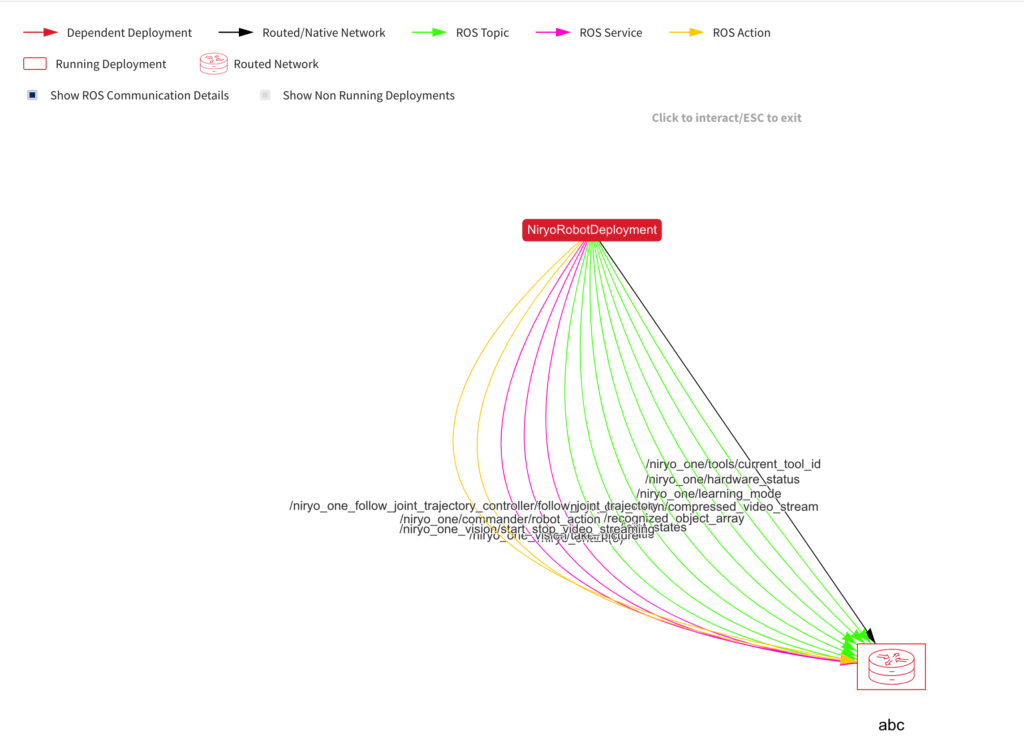
For the robot to forward ROS topics, services, and actions necessary for Moveit to execute commands, we need to explicitly select the following to be sent to the cloud (you can use this as a template for any Moveit robot):
Topics:

- /tf
- /tf_static
- /joint_states

Actions:

- /niryo_one/commander/robot_action
- /niryo_one_follow_joint_trajectory_controller/follow_joint_trajectory
For the Niryo One specifically, we’re going to add a few more to interact with it through it’s Python API:
Topics:

- /niryo_one/learning_mode
- /niryo_one/hardware_status
- /niryo_one_vision/compressed_video_stream
- /niryo_one/tools/current_tool_id
- /recognized_object_array

Services:

- /niryo_one/commander/set_max_velocity_scaling_factor
- /niryo_one/position/get_position_list
- /niryo_one/change_tool
- /niryo_one_vision/take_picture
- /niryo_one_vision/start_stop_video_streaming
- /niryo_one/calibrate_motors
- /niryo_one/activate_learning_mode
After the package has successfully been created, we can explore the deployment. To successfully deploy the package, one needs a “network” – a shared network between the different components that should talk to each other. There are two options: a native network (that works only either between devices in the same physical network, or between cloud components), or a “routed” network that works with any component (but has higher latency). Since we want to talk from the device with the cloud, we create a routed network. Comment
When we hit the deploy button, rapyuta.io will communicate with the robot and execute the shell script niryo-run-start.sh.
Now we just need to start a cloud component to receive the messages! For this can re-use the simulation docker image: just pass in REAL instead of FAKE for the launch command, and it won’t launch the simulated robot and instead, wait for the joint states and other messages to come from a real robot.
To put the cherry on the cake, we also found a way to add a webcam to the robot! At first, we tried to send a ROS ImageStream to the cloud, but that is slow because the encoding is not tuned for slow internet connections. The real deal here is WebRTC (which is used by video chat software that runs in the browser). For this purpose, we used a separate Raspberry Pi that connects to a simple website that contains code to open a Jitsi room automatically! With the Jitsi extension for JupyterLab we can pre-configure the same room and get a button to connect to the webcam automatically (by programmatically joining the same Jitsi room).
In the future it would be really nice if we could easily send video streams to the cloud – not only for inspecting the robot visually but also to further process the data with OpenCV and other tools to do things that wouldn’t be possible on a tiny Raspberry Pi.
The Automated Way: Introducing Ansible
Doing all these steps manually and through a user interface is quite cumbersome – especially when managing multiple such projects. That’s why rapyuta.io also has an API and an SDK. And even cooler: there is an Ansible module for rapyuta.io. Ansible is an IT automation toolkit that where the developer can define specific steps to bring the system into the “desired state”. With these steps, we can create or takedown everything on rapyuta.io: networks, docker images, packages, and deployments. Comment
Ansible uses templated YAML for the configuration. This means we can configure a pipeline and have some other values in a separate file (very useful for secrets that one doesn’t want to share). We’ve created an Ansible script for building the docker images and booting up deployment on rapyuta.io: sim_deploy.yaml
To run this, it’s easiest to follow the installation steps as outlined here. Once that is done, the images will be built, networks set up and the deployment started.
For example, the following entry in the Ansible script will create a Rapyuta network that lets the nodes communicate with each other through ROS:
    - name: Network Deployment
      async: 100
      poll: 0
      rapyutarobotics.rr_io.networks:
        name: native_network
        present: "{{ present }}"
        type: native_network
        ros_distro: melodic
        resource_type: small
The rapyuta.io module on Ansible Galaxy and the corresponding docs.

